Thursday, February 4, 2010

Don't Fret, Part 2: Slotting

Yesterday I covered how to prep the fretboard for slotting.  If you follow my recommendations, you should have a fingerboard blank which has been cut to the minimum dimensions, and has been marked for slotting.  Today, I will cover all the final preparations to the fingerboard. 


Cutting the Slots

Only simple tools will do...


Choosing the right saw is a very important part of doing a fret job well.  Fret wire has a narrow root called a tang that is inserted into the fret slot.  However, the width of the slot should be slightly larger than the width of the tang.  Fret wire has tiny, diamond-shaped barbs on the tang, which compress the fibers along the slot wall, holding the fret in place. 

Fret wire does it with tang...


Most fret wire on the market today requires a 0.023" slot width.  My hobbiest's razor saw has 0.015" kerf, though in practice, it cuts around a 0.020" slot, which is sufficient, and holds frets very well.  

Note: Reducing slot width has the additional effect of producing back-pressure on the neck, which helps the neck resist the bowing effect of string tension.

Before you begin cutting your precious fingerboard blank, use a scrap to test your saw.  Measure the kerf using feeler gages.  Using a caliper, measure the width of the tang, (not including the diamonds).  If the slot width is smaller than the tang, it is too small!

Electrician's tape makes a great depth gage.  Mount tape on the side of the saw that corresponds to your dominant hand.  Other types of tape work as well, but will stick to your saw and are annoyingly hard to remove.

Go ahead and pound a fret in.  If this is the first time you've done it, spend some time fretting scraps around the shop until you feel comfortable.  The goal, for now, is just to verify that your slot size is adequate. 

Also, please be aware that there are purpose-made fret saws out there.  Just visit my friends at StewMac.com.  Remember, you always pay more for specialty tools.  Razor saws are less than $10.

Moving on...

Position the try square on the fingerboard blank so that the try square blade is aligned with the first fret mark.  Holding the square with firm pressure, hold the saw with your dominant hand and begin cutting.  After a few strokes, the saw will become it's own guide. Turn the try square up to use as a perpendicular guide.  Cut down just to the bottom of the tape.  Twenty-two fret slots can be cut in about 40 minutes using this method.

Cutting the frets is quick and easy, just make sure your cutting in the right spot...


Wednesday, February 3, 2010

Don't Fret, Part 1: Prepping the fretboard.

There are a lot of sticking points in building string instruments.  A diverse array of skills are needed, and rarely will a newcomer be comfortable with every aspect of building.  For me, it was steam-bending.  I'm happy to say that I finally overcame this hurdle, but it took many failed attempts.  For lots of folks, fretting is the most difficult skill to master.  Over the next week, I intend to cover all the steps of a basic, unbound fret job. If I have time, I'll talk about ways to fancy up your fretboard with inlays and binding.

Last week, I covered nut compensation.  My technique requires that you alter the scale by shortening the distance from the nut to all frets by "0.050", so keep this in mind as you proceed.

So you've read my article, now you need to translate a long list of measurements into a physical object- your fingerboard. Let's start at the beginning:

Wood Selection

Ebony- My personal favorite, ebony is very hard and has an extremely dense grain.  Working ebony is similar to working hard plaster.  Saws and files work well with it, chisels and knives, not so well.


Rosewood- A very pretty alternative to ebony, rosewood is easier to work than ebony.  It has a moderate blunting effect on tools, so keep your sharpening stone handy.

Maple- Hard maple makes an attractive light colored fingerboard. This is the standard wood used on Fender stratocasters. Can be highly figured.  The more figure, the more difficult it is to work without tearout.  Sandpaper will cut the fibers.


Other Woods: Wenge, osage orange, purpleheart, ironwood, walnut, elm, etc. There are a ton of other woods than make acceptable, and sometimes exceptional fingerboards.  I encourage you to experiment.  The qualities that are important are hardness, density, availability, and aesthetics.

Initial Shaping

There are five pieces of information you need before you begin to prepare your fingerboard blank, the rectangular block of wood from which your fingerboard will be crafted. These are: scale length, number of frets, width at the bridge, width at the nut, and radius.  Use the free calculator I developed.  It will tell you exactly what dimensions your fingerboard blank should be.

Use a planer to reduce the thickness of your blank to the desired dimension, usually 1/4" to 3/8" depending on the instrument and the fretboard radius. Cut the fingerboard to the desired length using a miter saw, or handsaw and miter box. It is very important that the nut end is cut squarely. Use the table saw to rip the fingerboard to the desired width.

DO NOT TAPER YOUR FINGERBOARD UNTIL YOU'VE CUT THE FRET SLOTS!!!!

Just a warning, if you taper your fingerboard at this time, it will be very difficult to mark and cut the fret slots accurately.

Marking the Fretboard

There is more than one technique that will work for laying out and marking the fret positions on your fingerboard blank.  My preferred method is to use a caliper to layout the frets.  This is how I do it.

1) The fingerboard blank has been prepared.  If you've done everything properly, the nut end will be square with the fingerboard.

2) Fix the fingerboard to a nice, clean surface with double-stick tape, or clamp it down.  You want to make sure that the clamps will not interfere with the measurement.

3) Using the longest caliper you can find (I use a 12"), move the caliper blade down until you have dialed in the correct measurement.  On most calipers, you can measure to the nearest 0.0005" (five ten-thousandths of an inch).  When you are sure of the measurement, twist the thumbscrew to lock the caliper.

The sharp point of the caliper scores the fingerboard surface.

4) Holding the caliper with two hands, slide the caliper across the fingerboard, using the nut end as a guide. This technique will work until you run out of caliper.  With my 12" caliper, I can do up to 24 frets on a 16" scale (the 24th fret occurs at 3/4 of the scale length).

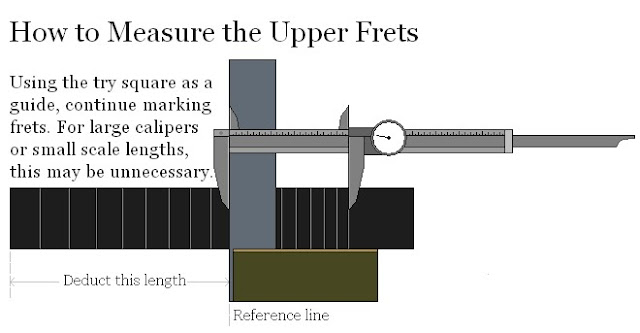
5) For the upper frets, use the caliper to measure off a reference point on the fretboard. Mark an X through this line so you don't confuse it with a fret line. Ten inches is a convenient reference point.  Clamp a try square just below this point.  Now you can use the square as the guide to mark the upper frets.

Marking the upper frets can be trying... get it?

Now, a note about the accuracy of this method. If you are interested in minimizing error, you should purchase a 24" caliper to perform these measurements.  A 24" caliper is large enough to make scale markings on all but the largest instruments. However, 24" calipers aren't sold at Lowe's.  They are an expensive, specialty item.  My twelve inch dial calipers were less than $100. If you are careful, and position the try square well, you'll find this method to be more than satisfactory. 

Monday, February 1, 2010

Nut Compensation

WHY AM I ALWAYS OUT OF TUNE?

Many of you have used an online "scale calculator" or "fret position" calculator to calculate fret positions to the ten thousandth of an inch, or with even higher (and still unattainable) precision.  You've marked out your fretboard with a dial caliper, you used a special luthier's fret saw and miter box.  You've spent all the money and time to achieve the highest level of precision.  And when you finally string up your instrument, it just doesn't work. What's the problem?

The nut isn't supposed to be located at the zero point of the scale!!!

There are many different adjustments that can be made that affect the playability of a string instrument- many more than I will treat here.  What I want to focus on is one of the most overlooked, but highly needed adjustments you will make. Nut compensation.

Why do I need compensation at the nut?

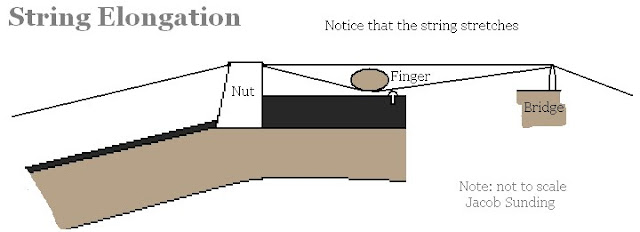
Imagine an open string. It is perfectly in tune.  You've intonated the guitar, which means you've performed some bridge compensation.  Now the twelfth fret is also in tune. However, when you press the string down at the first fret, you are stretching the string.  It has to get longer in order to contact the fret.

The harder you press, the sharper you get...

So, if you are in tune at zeroth (nut) and twelfth frets, you will be sharp at the first fret.

How do I correct for this?

The most common technique to deal with this is to move the nut closer to the bridge by shortening the distance to the first fret.  This is done independently of the scale length.  The question is, how do you know how far to move the nut?

Nut shaving technique

The answer is, I don't know how far to move the nut.  But, I've developed a technique that will work everytime.  I call it nut-shaving.  It goes something like this:

1) CUT IT SHORT- Before laying out your fretboard, deduct 0.050" from ALL measurements. If you use my fret calculator, located here, you can just add a column to calculate the new measurements. 

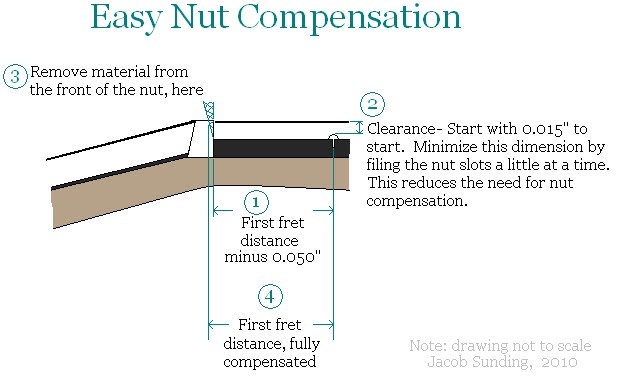
2) REDUCE CLEARANCE-  Now, you've cut your fret slots, shaped the fingerboard, glued it on the neck, etc. It's time to put strings on the instrument. Adjust string height at the bridge and at the nut.  Check the clearance at the first fret (see diagram below).  You want to start with 0.015" of clearance, or perhaps a little more, depending on your playing style, and slowly slot the nut deeper until you are comfortable.  Be careful! There is a fine line between perfect and buzzzzzzzzzz.  You are doing yourself a favor to make the clearance as low as possible.  Refer to the String Elongation drawing above to see why this is so.  If you reduce the clearance, the string doesn't stretch as much when you depress at the first fret.

3) SHAVE THE NUT- Tune it up, adjust the intonation (bridge compensation) and tune again. You should be in tune at the nut and at the twelfth frets.  Using a tuning fork, piano (one that's in tune) or preferably a strobe tuner, check the note at the first fret. IT SHOULD BE FLAT.  What we've done is we've shifted the entire fingerboard up the neck by 0.050".  Now, tape off the fretboard, and break out a small, flat file. Detune the string you are working on, and shift it out of the way. Remove material from the face of the nut, working back at an angle, until the string is in tune at the first fret.  Replace the string, retune. Continue to check that you are still in tune at the twelfth fret. Now check to see if you are still flat at the first fret.  If you become sharp, STOP!

4) Check the other frets.  You should now be "in tune" at every fret. Repeat for each string.  Refer to the diagram if you get stuck, and remember to have fun.


Nut shaving technique illustrated...

Sunday, January 31, 2010

Scale Calculator

Definitions of calculated values...


I've decided to share a simple calculator I created for determining fret positions for string instruments.  This calculator has a few features that others do not.  Namely, it calculates marker positions, fret widths and radius measurements as well.  Helpful diagrams are included.  Please provide feedback on how I can make this calculator more powerful. 

Download the most recent version here as an excel file:

Hole Saw Chimes (For sale on Etsy)

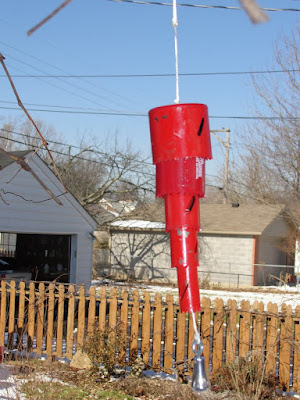
Anyone who's ever dropped a hole saw on the floor knows that these bell shaped tools ring loudly with clear sustain and nice even tone.  None of that gong-ish dissonance.  The steel from which the hole saws are made has been treated to be very hard.  This is the secret to their high-pitch and chime-like quality.  What's more, they nest for easy storage.  In this project, I chose to arrange them from largest to smallest, separated by knots on a piece of nylon string.

  It's beautiful to me...

Hanging the saws in this way makes each one become the knocker for the one above.  As for the smallest saw, it doesn't have much volume, so I wasn't concerned about adding a knocker for it- although it would be easy to do.  

An eye bolt screwed into a drawer pull serves as the bottom weight.  This makes a great door bell for a shop. 

Cigar Box Mandolin


About two months ago I began work on a mandolin, using wood gifted to me from various folks.  The soundboard is bookmatched pine from a huge old barn beam. The neck, sides, and back are made from mahogany scraps from a local furniture maker. Anyway, I was reading Roger Siminoff's mandolin book (and following his plans, mostly).  I prepared my sides, soundboard, back and neck. I chose to use the v-shaped dovetail joint to join the neck to the body, but when I went to cut the dovetail on the neck, I made a terrible mistake.  Although I cut to my line, my saw bowed inside the cut.  The result was a haphazard cut, deep in the base of the neck, that no amount of sanding could remove. Well, consider that neck dead.


Like a phoenix, the neck rose from its own ashes, sort of...


But, I never throw anything away.  I'd spent too long choosing just the right piece of wood, shaping the neck profile.  I just put the neck back on the shelf, with the rest of the mandolin, and moved on to other projects until I could live down my disgust.

Well, I guess I did.  I was spurred into action after getting the new issue of Make Magazine.  I read Make from cover to cover.  Most of their articles are about electronics or micro-controller projects, but often they have musical projects as well.  So, what got me moving?  The MYO cigar box guitar article.  There's even a thumb of the project on the cover.  Link to the article here:
 http://makezine.com/21/cbg/

I didn't follow their plans, I was just inspired. 


So I asked my wife where do we keep the old cigar boxes.  Surprisingly, she knew.  She buys them as funky organizational aids and we were well stocked.  I chose a slight, all cedar "Hoyo de Monterrey" from Honduras that made a nice loud sound when I thumped it. 


El old cigar box la Tapa Negra...

I noticed in the make article, and from image searches, that most CBG's use the lid as the soundboard.  I consider this to be a mistake.  The lid on my box is only held on by a glued paper hinge. Also, the paper glued on the lid could act as a damper.  Thus, the bottom became the top.  .


But what to use for a neck?  It would be fairly easy to make a flat, one piece neck for a simple two or three string guitar, but I want something that can play.  That's when I found the ruined neck from my previous project. This could work.


The belt sander saved the old neck, and with a few strokes from my highly recommended Erik Frost carving knife that I never accidentally stab myself with (product placement), the new neck came into being. 


Detail of the neck joint... I glues and screws it, then I uses it...

I chose to meet the body at 6 degrees, as Siminoff suggests.  Mine meets at the sixteenth fret, which puts bridge height at just under 3/4 inch.  I chose a 13" scale, which is a bit small, but reduces the tension on the neck.


Speaking of tension, how do you make a cheap little cigar box carry these loads?


1)  Reinforce the box.  You can't trust those little box joints.     Glue in some lightweight corner braces.  Pine will do. Mahogany is better.


2) Brace the soundboard somehow.  There are myriad ways, X-brace, tone bars, fan bracing...  Because the soundboard is so small on this instrument, I elected to combine the bridge reinforcement with a diagonal spar.  My brace is a piece of picket fence cedar that split naturally into this beautiful diamond shape, which I then cleaned up on the belt sander.


No guts, no glory... 

3) Neck block. A lightweight pine neck block will do.  Whatever type of neck joint you are using, you will need to design the neck block appropriately.  In this case, the neck block receives the screws for the neck joint. Make sure that the neck block does not make contact with the soundboard on an instrument this small.  You will have NO bass response.

4) Tail Block.  Also made from pine, receives the strap button and tail piece.

5) Lid.  The force generated by the strings puts the back of the instrument in tension.  By screwing the lid down, much of this will travel through the lid rather than the body.

Two screws in the lid allow it to carry tension...


Fin- The complete mandolin rests in its autoharp case...

Followers