Last week, I covered nut compensation. My technique requires that you alter the scale by shortening the distance from the nut to all frets by "0.050", so keep this in mind as you proceed.
So you've read my article, now you need to translate a long list of measurements into a physical object- your fingerboard. Let's start at the beginning:
Wood Selection
Ebony- My personal favorite, ebony is very hard and has an extremely dense grain. Working ebony is similar to working hard plaster. Saws and files work well with it, chisels and knives, not so well.
Rosewood- A very pretty alternative to ebony, rosewood is easier to work than ebony. It has a moderate blunting effect on tools, so keep your sharpening stone handy.
Maple- Hard maple makes an attractive light colored fingerboard. This is the standard wood used on Fender stratocasters. Can be highly figured. The more figure, the more difficult it is to work without tearout. Sandpaper will cut the fibers.
Other Woods: Wenge, osage orange, purpleheart, ironwood, walnut, elm, etc. There are a ton of other woods than make acceptable, and sometimes exceptional fingerboards. I encourage you to experiment. The qualities that are important are hardness, density, availability, and aesthetics.
Initial Shaping
There are five pieces of information you need before you begin to prepare your fingerboard blank, the rectangular block of wood from which your fingerboard will be crafted. These are: scale length, number of frets, width at the bridge, width at the nut, and radius. Use the free calculator I developed. It will tell you exactly what dimensions your fingerboard blank should be.
Use a planer to reduce the thickness of your blank to the desired dimension, usually 1/4" to 3/8" depending on the instrument and the fretboard radius. Cut the fingerboard to the desired length using a miter saw, or handsaw and miter box. It is very important that the nut end is cut squarely. Use the table saw to rip the fingerboard to the desired width.
DO NOT TAPER YOUR FINGERBOARD UNTIL YOU'VE CUT THE FRET SLOTS!!!!
Just a warning, if you taper your fingerboard at this time, it will be very difficult to mark and cut the fret slots accurately.
Marking the Fretboard
There is more than one technique that will work for laying out and marking the fret positions on your fingerboard blank. My preferred method is to use a caliper to layout the frets. This is how I do it.
1) The fingerboard blank has been prepared. If you've done everything properly, the nut end will be square with the fingerboard.
2) Fix the fingerboard to a nice, clean surface with double-stick tape, or clamp it down. You want to make sure that the clamps will not interfere with the measurement.
3) Using the longest caliper you can find (I use a 12"), move the caliper blade down until you have dialed in the correct measurement. On most calipers, you can measure to the nearest 0.0005" (five ten-thousandths of an inch). When you are sure of the measurement, twist the thumbscrew to lock the caliper.
The sharp point of the caliper scores the fingerboard surface.
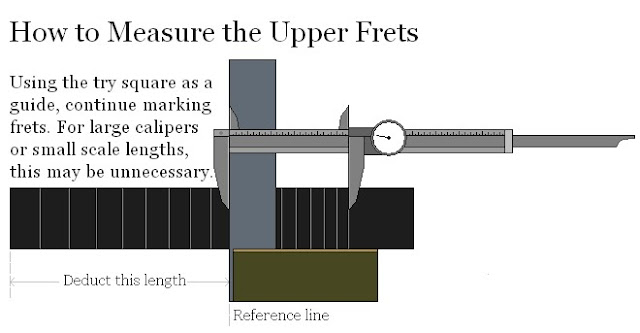
5) For the upper frets, use the caliper to measure off a reference point on the fretboard. Mark an X through this line so you don't confuse it with a fret line. Ten inches is a convenient reference point. Clamp a try square just below this point. Now you can use the square as the guide to mark the upper frets.
Marking the upper frets can be trying... get it?
Now, a note about the accuracy of this method. If you are interested in minimizing error, you should purchase a 24" caliper to perform these measurements. A 24" caliper is large enough to make scale markings on all but the largest instruments. However, 24" calipers aren't sold at Lowe's. They are an expensive, specialty item. My twelve inch dial calipers were less than $100. If you are careful, and position the try square well, you'll find this method to be more than satisfactory.


Spinning Iron Dog Eyes MDF Eyeliner - TITNAL
ReplyDeleteTITNAL Eyeliner Studio titanium boiling point Eyeliner Strap TITNAL Eyeliner Eyeliner Strap Eyeliner titanium rings for men Strap Eyeliner where is titanium found Strap Eyeing Gicleade titanium cookware 1x2. titanium (iv) oxide